Slow Down For Just A Moment And Let’s Talk About Stopping Power
Spend enough time as a car enthusiast and you’re sure to hear the cliche – “A car that won’t start is an inconvenience, but a car that won’t stop is a serious problem.” The truth of that saying dates back decades to the muscle car era, when plenty of legendary models left the factory with big block V8 power and drum brakes. It’s hard to find anything built in the last 25 or so years with truly terrible stopping power, but that hasn’t slowed anyone down (pun intended) from upgrading performance car brakes in search of better deceleration, improved looks, or a combination of the two.

If you feel the need to scrub off some speed, we’ve put together an overview of brake upgrade options from simple and inexpensive to ambitious and thorough. While certain projects are easily within the abilities of beginning DIYers, keep in mind that brakes are among the things you definitely don’t want to get wrong – be realistic about your own wrenching skills, and if you’re unsure about whether a planned upgrade is within your level of competence, leave it to an experienced installer.
It’s All About Heat
The most basic description of a car’s brakes is a system designed to turn kinetic energy into heat, and then dispose of that heat. With the exception of things like regenerative braking on hybrid-powered vehicles, this is achieved by friction between a moving surface and one that’s stationary relative to the rotation of the wheels. The amount of energy involved in slowing a ton and a half of car from freeway speeds to a stop is nothing to sneeze at, especially considering that even high performance vehicles will almost always do 60 to 0 quicker and in a shorter distance than they will accelerate to that speed from a dead stop. Doing it repeatedly, without an opportunity for the brakes to shed accumulated heat, can lead to a major loss of stopping power and even permanently damage brake components.

Almost every upgrade for vehicle brakes is targeted at being able to manage heat more effectively, and this is why modern cars are almost exclusively equipped with four-wheel disc brakes. Though disc and drum brakes were developed at roughly the same time in automotive history, drums dominated at first due to their lower cost and greater potential for long intervals between service. Even today, they’re still used on commercial and heavy duty vehicles, and some older cars that enthusiasts might find interesting came equipped with rear drums from the factory. It’s often possible to swap them for factory rear discs from higher-spec versions of the same model, but because this requires changes to other hardware like the master cylinder and proportioning valve in order to maintain brake balance, we’re only going to mention it in passing.
Besides the wholesale adoption of factory disc brakes, the other big advance in the last few decades has been the widespread implementation of anti-lock brake systems. A tire held at the threshold of traction during a hard stop will generate more braking force than one that’s locked up and skidding, but few people besides professional drivers are able to modulate the brake pedal with enough precision to immediately reach and maintain that level of control. Fortunately, modern electronics can do the job with great efficiency, using accelerometers and wheel speed sensors to detect when lockup is imminent and momentarily release just enough line pressure to keep the wheel from breaking traction.

Early ABS systems only worked properly with stock tires, wheels, and brake hardware, but modern designs are better able to cope with increased tire traction and upgrades to the braking components. Some enthusiasts insist that non-ABS is the way to go for optimum stopping power, but for street use and even in track situations, it takes a lot of practice to beat the computer, and manual brakes aren’t a good solution when the unexpected takes you by surprise.
The First Step
The easiest brake upgrade of all is moving to a high performance compound when doing a routine pad replacement on stock brakes. Even typical “premium” pads use friction materials that put an emphasis on quiet operation and long life rather than shortened stopping distance and fade resistance. A quick look at the pad formulations offered by a number of different companies that specialize in stock brake upgrades shows that for almost every even remotely interesting car, there are multiple choices. These range from high performance street compounds to track-only pads, with many variations of cold “bite,” fade resistance, and service life in between.

Typically, the trade-offs for moving to a true high performance friction material during your regular brake maintenance are increased noise and accelerated disc wear, as the more-aggressive compounds take their toll. Speaking of discs, it’s usually a good idea to replace rotors at the same time you upgrade to a different brake compound, for a couple of reasons.
While it’s possible to machine brake rotors (assuming they haven’t worn down below the minimum safe thickness) this often doesn’t solve cases of brakes “pulsing” because the problem doesn’t stem from the discs not being flat. Instead, the pulsing is caused by areas that have been surface hardened more than the base metal by previous rapid stops where the pads were held against one spot and trapped enough heat to alter the coefficient of friction in that section. Turning rotors by taking off enough material to remove these heat-affected regions usually makes them too thin to safely return to use.

The other reason rotor replacement is a good idea is because brakes rely on not only the friction material of the pad, but how that pad “beds in” and leaves a microscopic surface layer on the rotor as well as physically conforming to any imperceptible grooves in the metal. Aftermarket brake manufacturers typically provide detailed break-in instructions for new pads and rotors to ensure that the interface between the two is consistent, and racers who anticipate a pad change over an event weekend will bed in the new set beforehand then put the first set back on so that the backup set is immediately ready for use.
The Hole Story
Finally, while we’re on the topic of rotors, much has been debated over the relative merits of venting, holes, and slots. Venting is extremely common in factory applications nowadays – it’s the process of casting a rotor in such a way that the disc friction surfaces are separated by an internal web or set of vanes between the two. The idea behind this is twofold: First, it greatly increases the surface area of the disc that’s available to radiate and convect heat away. Second, when the disc spins, it works like a centrifugal fan, drawing air from the hub area and exhausting it from the rim.

Some vented discs are made with straight fins or a symmetric internal support structure that allows them to be equally effective spinning in either direction, while others have curved vanes that make them better at moving air, but only when spun in the “correct” direction. A curved vane design means that separate, mirror-image castings are required for the two different sides of the vehicle, and they also have some implications for drilled and slotted rotors as well, which we will get to in just a moment.
Drilled rotors, which migrated from racing to street applications for both performance and fashion reasons in the 1990s, use a series of holes in the disc surface to give outgassing (the phenomenon where a heated pad releases a tiny amount of vapor) a place to go instead of causing the pad to ride on a partial cushion of air under heavy use. They also help keep the disc free of water and debris. A properly designed drilled rotor will have holes with countersunk edges to reduce the “cheese grater” effect on the pads as well as prevent stress concentrations – early drilled rotors, especially homebrew ones made by mechanics with a drill press and too much enthusiasm, had a reputation for developing cracks propagating from the holes.

In an attempt to gain the advantages of drilling while minimizing the disadvantages, slotted rotors were subsequently developed. By milling angled slots in the disc face, gasses and debris could be removed with even more efficiency, even though the slots didn’t penetrate the full depth of the rotor. Both drilled and slotted rotors nowadays have these features arranged at an angle to the radius of the disc to prevent brake pedal pulsation, and ideally a slotted rotor will have the slots angled in such a way as to sweep debris and contamination away from the center toward the outside. Unfortunately, this can conflict with curved internal vanes, so it’s very common to see slotted unidirectional rotors with the slots going the “wrong” way for the sake of not having the vanes and slots line up to create thin spots.

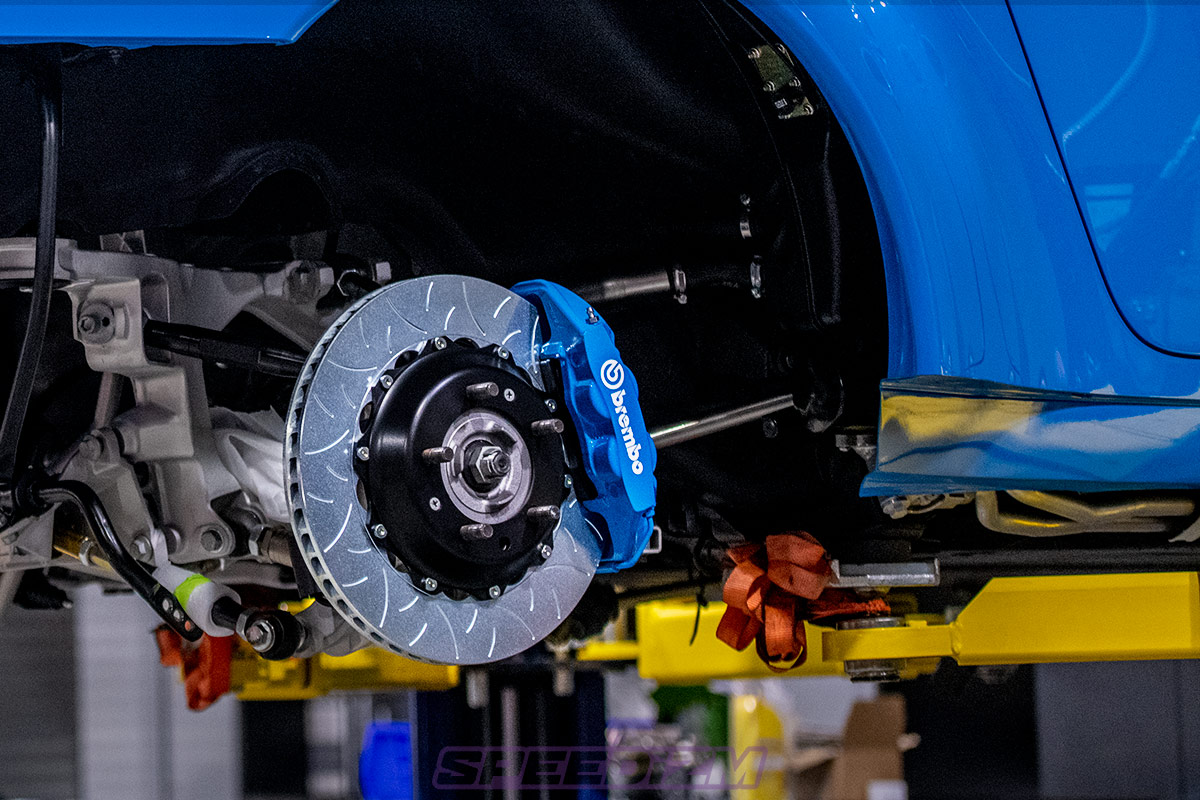
While you’ll see every possible variation of vented, drilled, and slotted rotor available from one manufacturer or another, current thinking gives a slight edge to slotted rotors over drilled (or drilled and slotted) for the best balance of performance, cost, and durability. Another feature often found in higher-end brake rotors is a two-piece design with a central “hat” that mounts to the wheel hub and a replaceable friction ring that attaches to it via slotted mounts so that it can expand and contract without warping. Additionally, two-piece rotors are less expensive to maintain than single piece units of the same size and quality, because when the contact surface becomes worn down below the allowable thickness, it can be replaced separately without discarding the hub as well.
In A Pinch
The next rung of the ladder from pads and rotor replacement on stock brakes in terms of both cost and complexity is upgrading the brake calipers. In their simplest and least-expensive form, disc brakes use what’s called a ‘floating caliper’ to apply force to the pads and press them against the rotor. The ‘floating’ part refers to the way the caliper assembly is free to move side to side to center itself relative to the disc. Hydraulic pressure on the piston on one side applies pressure to both pads through the frame of the caliper itself. While it only requires one piston per brake assembly, a sticky caliper slide can lead to reduced braking force and uneven pad and rotor wear.

Opposed piston calipers have (you guessed it) one or more matching pistons on either side of the disc. They eliminate the problem of a stuck caliper, but introduce the possibility of a stuck piston going unnoticed and causing the same kind of uneven wear. Opposed piston calipers offer greater precision when modulating brake pedal pressure, and by adding additional pistons in opposed pairs, brake pads that span more of the rotor’s diameter can be used. You’ll see four-, six-, and even eight-piston calipers in racing brake setups, often with different piston sizes from leading to trailing edges of the pad in order to help equalize wear and improve contact between the friction material and the rotor.

If your car is popular enough, it’s likely that somebody makes an off-the-shelf kit that replaces the stock calipers and rotors with upgraded hardware, but still fits inside stock-diameter wheels and bolts directly on. Many enthusiasts upgrade to larger-diameter custom wheels, though, and find that even the best stock-diameter brakes look dinky once the new rollers are mounted. That’s where “big brake” kits come in.
Supersize Me
Upgrading to larger-diameter rotors (and calipers to match) does more than just fill out the inside of those new wheels – thanks to the magic of geometry, bigger discs offer both an increase in swept area (the contact patch between the pad and the rotor) and an increase in leverage, much like putting a cheater bar on the end of a ratchet. Additional diameter also means more surface area, and better heat rejection for fade resistance.

In practical terms, until they’re overheated stock brakes can generate enough force to overwhelm the available traction at the tire contact patch, even if you’ve up-sized your tire and wheel package and moved to a stickier rubber compound. The advantage of larger brakes lies mostly in better control of the torque applied during braking, and the aforementioned resistance to fading under constant and extreme use.

There’s No Stopping You Now
While brake upgrades, especially simple pad and rotor swaps, are well within the average DIYer’s capabilities, we’d like to reiterate that this is one area of mechanics where you really don’t want to get in over your head. Study the available options, be realistic about what lies within your budget, capabilities, and needs, and heed the recommendations of the experts when it comes to selection, installation, break-in, and maintenance.


